Tuesday, June 17, 2014

DIY Monochromatic Dino Jars

Welcome back!

Today I will be showing you all how to make Monochromatic Dino Jars for our first DIY of Summer 2014. 


This is a great project to do to create storage for your kids using their old toys or...
for the fun loving adult that still loves them some Land Before Time. 
Okay, maybe that's just me. 
Either way, it's an easy way to create some cute storage for any room in the house! 
So here it goes...


You will need: 
- small plastic animals of your choice
- Mason Jars
- spray paint of your choice
- plastic storage caps (optional)


The first step is to spray paint the toys the color you have chosen! 
For full coverage COVER them well on all six sides. 
Yes, the left side, right side, front side, back side, top, and underneath. 
Also make sure you follow the directions on the can on how long to wait in between coats.
If you are impatient like me, you may end up with sticky Dinos if you don't let coats dry long enough between the next one. 


See super cute!


Next up is the lids. You have a couple choices here. 
I chose to buy the white plastic storage caps for $3.50. 
They just looked so much crisper and I didn't have to worry about spray painting them to match! Win, win.
If you go this route just make sure the width of the lid matches the jars you have.
Your other choice is to use the lids that come with the Mason Jars and spray paint them to match the color you chose for your Dinos, or other toys. 


We are almost done already! 
The last step is gluing the Dinos to the lids. 
I used this Super Glue because it said that it works best on plastic and would be completely clear when it dries. 
You just simply put TINY dots on their feet and let them settle. 
Now, I wasn't very impressed with how sturdy they are on the lids... but it still got the job done for me. If you are using this projects for kids, I would definitely suggest something like a hot glue gun or even Gorilla Glue to really make them stay in place. 


As always, be careful of the glue drips... unless you like peeling off your fingerprints.
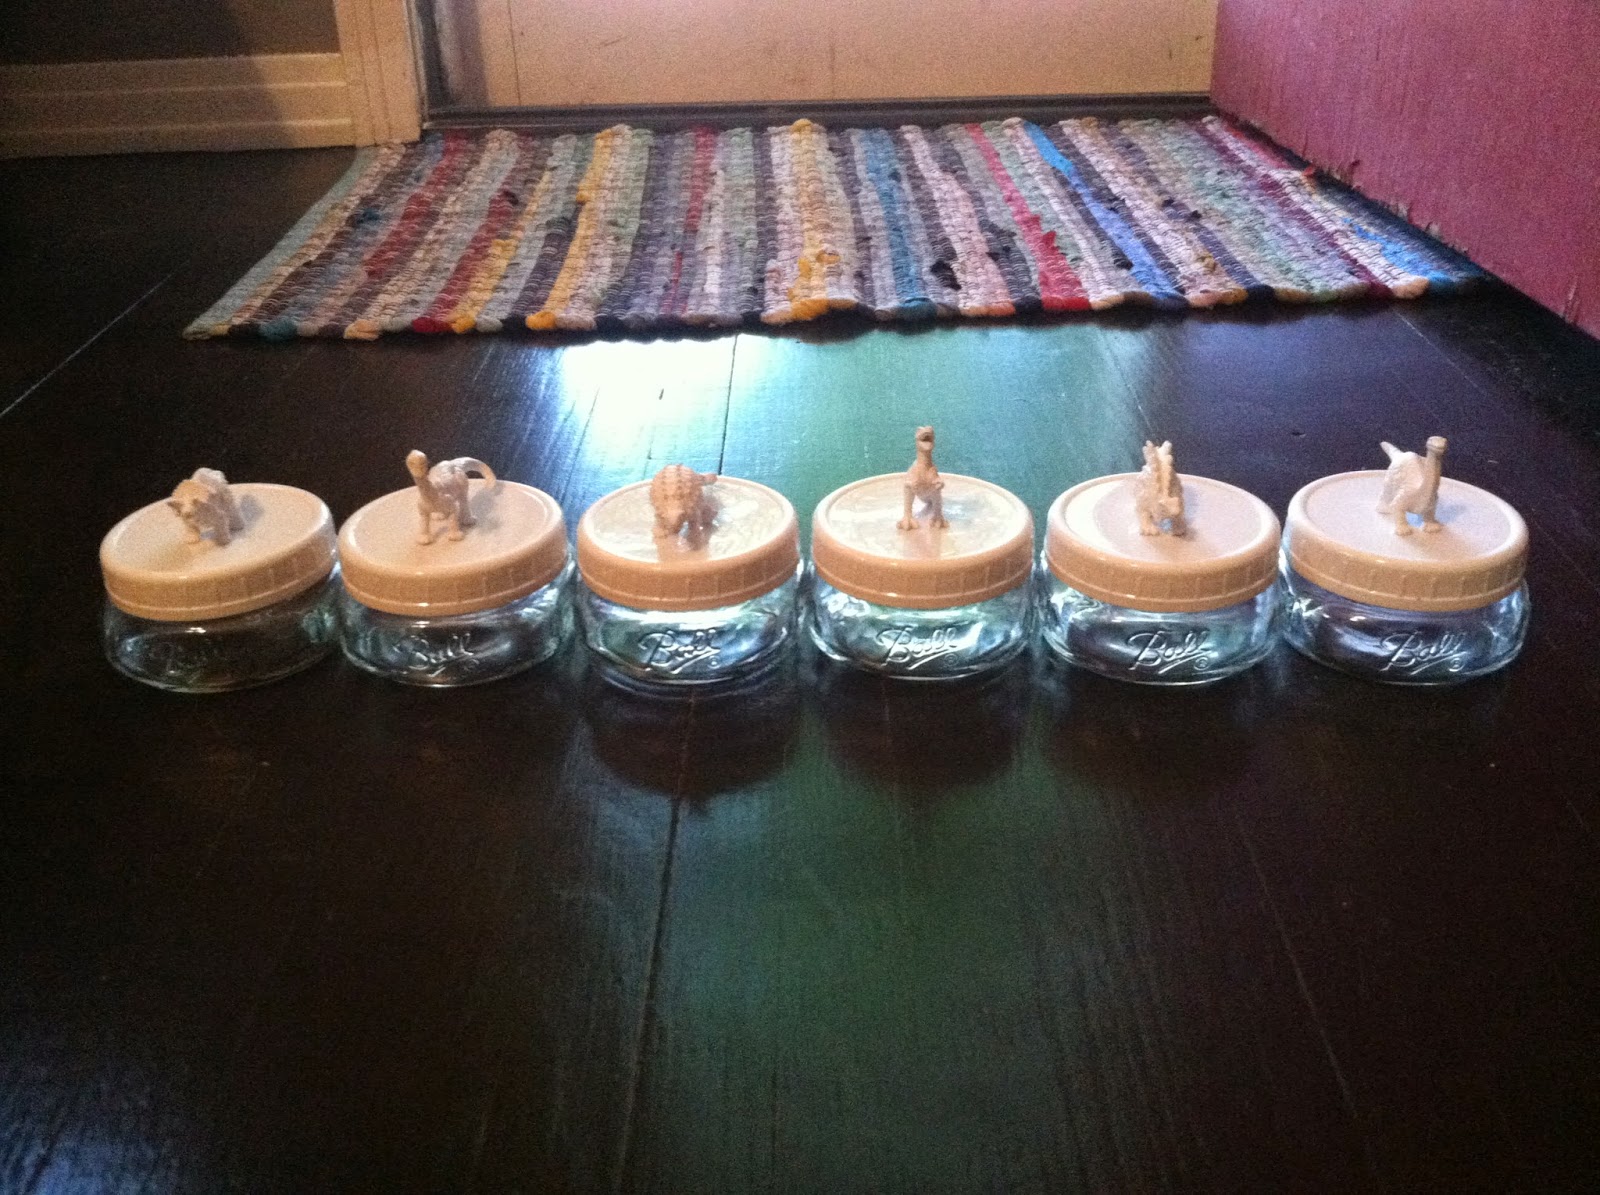

TADA!
What I love about Mason Jars is that there are many different sizes, but most have the same size of mouth on the top. So you could get these plastic caps and use the bigger jars for even more storage!


I hope that you find this project as fun as I did! 
I plan on using these for storage for craft supplies on my pegboard organizer... which is another fun project I can't wait to share!
What would you put in your fun new Mason Jars? 
Please let me know! :)


And I leave you with the laughing T-Rex. 

Creatively Yours, 
Audra

Monday, June 16, 2014

Summer Blogging Layout

Hey All! 

I'm back and ready to get busy with three.six.five projects this summer. 
You may have noticed that the look is different, I now have a logo, and business cards!


And when things get going and posted to Etsy for sale those business cards will also be used for tags on purchases... Exciting stuff! 

So this summer the layout will be a little different so I can keep on top of things a little better... There will be a certain topic each day so that I am held accountable to what I want all of my readers to get out of three.six.five projects. 

Here's what a typical week will look like: 


On Sundays the above image will be posted, except it will tell you specifically what you will be reading about that coming week. 
For example, on Tuesday it would tell you the name of the DIY tutorial project. 
Or on Friday it will tell you what project you will see "flashbacked." 

So let's break it down a little further...

Mondays are basically wild cards. A maker has to have time to make! I may let you know what I'm currently working on, or give you an extra DIY tutorial for the week, or let you in on a good deals or events going on in the area. It will just be a good way to start off the week! 
 Tuesdays I will be taking you step by step through some fun projects I am working on. It will be a wide range of DIY, so everyone will get a taste of something they will like! Projects could range from furniture upcycling to decor styling or hoop art and coffee mug making. I promise it will be broken down into easy steps so ANYONE can create, because that is my whole purpose of this blog!
 Wednesdays will be a way for you to get plugged into the things that I am using or reading so that you can try them out on their own. Each Wednesday I will tell you what I'm liking in the following areas:
1) Crafting Supplies
things that will make crafting easier
2) Everyday Living
recipes, household supplies, etc
3) Reading or Blogging
books on creative living or
other inspirational bloggers/crafters
 So I have a Thirty by Thirty list that I am trying to complete by my thirtieth birthday! Thursdays will be used to update on any progress and adventures from the list. Stay tuned this week for the list itself as well as a BIIIIIG project that has all of my heart and will be going with the list!  
On Fridays we will either be taking a look at projects I've done in years prior and making those into tutorials or flash-forward to upcoming projects that I would love your input on. 

Lots of stuff going on right?! I know checking in everyday is not at all possible for most people. There are other ways to stay up to speed... Sign up as a follower to receive notification when I post, come back once a week to stay on top of things, follow my personal Instagram using the hashtag #threesixfiveprojects... and definitely check things out on the Facebook page since that is where giveaways will be from time to time! 

As always, I would LOVE your input when it comes to anything from blogging ideas or project ideas. I may actually work in an incentive if you give me an idea for an amazing project and I use it! 

So please, join me for this wonderful ride because three.six.five is about to take off! 
Buckle up and enjoy the ride. 

Creatively Yours,
Audra

Monday, March 24, 2014

Instagram, bloglovin', and Spoonful of Imagination, Oh My!

Just a quick update on a few of my favorite things while I watch The Voice.
(There's a girl named Audra, yay!)


I have always loved me some Instagram... but as of late the people I follow has really taken off. Why? Because there are SO many amazing handmade crafters out there that I would never have had access to without Instagram. Between crafters tagging each other in posts and the use of a hashtags I have so many phenomenal and inspirational crafty women. Through Instagram I found the next two of my favorite things! 


bloglovin'.... WOW. I just love it because of the ease of use and clear organization. What is it you ask? All you do is sign up for an account, enter the names of your favorite blogs, and it creates the feed FOR YOU as new updates are added to the blogs. Another great thing about it is that it is a FREE app for your phone! Doesn't get any better than this folks. I have came across SO many create blogs here lately and what a headache it would be to try and keep track of them on my own. Can you imagine the mess?! I can't. This tool is a lifesaver!

After many of my projects I often hear, "How do you do that?" or "You are so creative! I wish I could do that." Honestly, I'm a copy-cat crafter. Is that a thing? I don't know, but it's true. I see an idea, and I make it my own with a few tweaks here and there to personalize it or I combine several different ideas for a new project all together. (Insert Pinterest obsession here) 


Anyways, my final share for you is a crafting blog/company that I found through Instagram today. It's called a Spoonful of Imagination. Not only does it has great DIY's, but it brings them TO YOU! With the Spoonful Tribe she puts together a great craft, a how-to video, along with the supplies, and ships it to you! It's a monthly subscription, and it looks like you could possibly do it month by month for a relatively low price. So, if you struggle with DIY or just want to be networked with other great crafters I think this would be a great start for either direction! 

Today wasn't about my projects, but connection you with other people with the same passion that I have... just CREATE!! Hope you have been inspired like I have!

- Audra 

Friday, March 21, 2014

DIY Be My Guest Sign


As with most of my projects, the idea for this one came from some great finds on Pinterest. Here are the pictures of my pinspiration: 

Love the sign for a guest room!
Love the wall shelf and "Be My Guest" for a guest room


Who doesn't love them some Beauty and the Beast inspired home decor?! 

Obviously the first step would be to find the lettering and all the supplies for creating this project: 


I picked out a scrapbook paper color palette to go with my guest bedroom. 
Then I wanted to have the mixed metals so I found some great keys made for scrapbooking and various sparkles (a must have in any crafting project.) 
{This is where you make it your own! Get CREATIVE. :)}

After you have all the supplies it's time for the planning of what goes where with the scrapbook paper. I'm a perfectionist, so this part takes way more time than necessary. 


Yep, as you can see in the picture, I also did the word "our"... hopefully for a change out in the future, if ya know what I mean. Or if I feel like selling it later it's good to go. 

Once everything is planning out, it's time to cut out the letters. I just turned over the paper, kept the letter backwards, and traced in on with pencil. 
I wanted a border to appear, so I cut on the inside of the pencil lines. 


After making sure everything fits, put the letters aside and it's time to paint where the borders and edges will be seen underneath. 


These letters seemed to be made of mixed material, somewhere between a cardboard and wood. It absorbed paint very well, so multiple coats were needed. 

Then it is time to glue the letters to the wood. Now, I have a bad track record with Modge Podge and paper... it gets the paper soggy, it bubbles up, and I cry. But this time I gave it a try only because I found out the line that is specifically for paper! Lifesaver. And Kleenex saver. 


The trick is to use a foam brush and put in on the back of the paper for the first coat! It barely takes any Modge Podge at all, and it sticks almost right away. The instructions say to apply top coats after 2 hours, but I was so happy with the way it looked (and didn't want to chance ruining it) that I kept it this way. 

Now comes the FUN part! Embellish, bling, and twine away!


(The switch from Be MY Guest to Be OUR Guest) 


This is my initial vision of putting the new sign on the bookshelf in my guest bedroom... but I may come up with another way to display it as well. 

Although it was a timely project, it was so much fun to make something that is completely and uniquely my own! 

Take my ideas and create something even better... I would love to see what you come up with. :)

Monday, July 15, 2013

Prezi Presentation on Fab Mudroom Bench

If you would like to see a more animated how-to tutorial for the Drab Hope Chest to Fab Mudroom Bench project, go on over to http://prezi.com/pfdxx0dul4m5/untitled-prezi/.

Monday, July 8, 2013

Old Wooden Desk into New Coral Vanity


 Yet again, I thought that this project was going to be the simplest one to date! All it needed was paint, no real detail work. Man, was I ever WRONG! Luckily it turned out alright, but it was one heck of a roller coaster ride to get there (and I don't like roller coasters)!


This desk was my brother's desk growing up. I had one too but I liked the style of this one much better with its simple lines and basic knobs. Among my many pins on Pinterest I had some pinspiration to turn it into a vanity for my little closet room that will be in the new house! I'm not a fan of the word "vanity," but I know that's what it is referred to as. I have never, ever gotten ready in the bathroom. Sharing a bathroom with 2 brothers, I always got ready in my room sitting in front of my dresser mirror. Did the same thing living on my own since it takes forever to dry and straighten/curl my hair. So to me this project didn't seem so "vain."


As always, I started off with a priming base over all the areas I planned on painting. Once dried I painted the drawers the cream color first and then turned the desk over on its top to do the first couple coats of paint. I like to do this to get the bottom parts that would normally be hard to reach because of the floor as well as underneath the ledges out of the way first.


Then the desk is turned over to finish the cream coating. You can't really tell in this picture but the only part that is not cream at this point was the top since it would be painted a coral color called Dark Mango. 


While the desk was drying it was time to get the knobs painted. I did not prime these ahead of time, which may have caused the reason for 5 coats... but after doing the top of the desk in the same color with prime it was still an issue. Side note: I'm not a pink person, but sign me up for coral!


 Yep, had to get creative on getting the knobs painted! I had to figure out a way to get the knobs stationary so I wouldn't have to hold them and paint them at the same time. So what we have here is the screws poked through the Diet Coke box and once again screwed in with the knob. Now they are ready to paint. Keeping crafty classy!


In between coats on the knobs I did coats of paint on the desk... many coats of paint. At least seven. I wish I was kidding. I tried to pretend that it didn't bother me but ultimately I had to fix the uneven paint. 

It was also during this time that I accidently spilled paint, stepped in it, and then tracked it on the carpet. Pretty sure I saw my life flash before my eyes. Since I'm currently staying at my parents, it was my mother's carpet not mine. Now, my fear of getting anything on her carpet far exceeds my fear of spiders, buses, and needles combined. I frantically called my father who actually ended up leaving work to check on me, shampooed for at least 30 minutes straight, prayed that God would show some mercy on my soul and finally it paid off, mostly.


 As you can see, the top of the desk had some issues with even coating. But I tried to work through it and put the drawers in...


 ... and then the knobs. But then I finally gave into my OCD about the top being uneven. I had to go get another sample container of the paint. Then I sanded the top to get excess paint off and try to even it out. Once that was done I tried out the roller to paint the top. I'm not a fan of rollers because the way it goes on spongy, so my mom was there helping for moral support...


...and then she spilled too! At least hers was on the canvas (which ended up bleeding onto the carpet, hello again Mr. Shampooer). But as you can see it splattered back onto the cream, which I had to touch up. I think the coral color may have been cursed.


However, the roller worked pretty well and it all paid off in the long run. 


 A little close up to show off the smoothness of the Dove Cry's (cream) color, I can't get enough of it!


And this will be the mirror that hangs above the vanity desk! It was a clearance find at Hobby Lobby, my favorite hiding place. Seriously, if you can't find me try HobLob first. I still need to find a cute chair to refurbish to go with the set. I also plan on getting vanity styled lights to put above it, maybe a lamp, and then a smaller vanity mirror for doing makeup!

Hope you enjoyed the final product as much as the roller coaster of a process!

Until next time, 
Audra

Tuesday, July 2, 2013

Drab Hope Chest to Fab Mudroom Bench


 This project was by far the most in depth one I have done to date. However, it did teach me a lot about the little details and I am proud of the end product.


This is the original piece, my Grandma Chubby's hope chest from when she was growing up. It was just sitting around in her basement so she told me I could take it and fix it up. Naturally, I had many pins on Pinterest just inspiring me to transform this drab hope chest into a fab mudroom bench! I took the idea and ran with with it. 

My first buy was the fabric that I wanted to use for the bench cushion, and then everything just came together from there. Then came the new handles and knobs, followed by making a decisions on how to go about painting it (which took hours of pondering, no lie).


Prepping List:
Hope chest
Wood filler
Bonding Primer
Paint brush
Multiple paint colors
Paint tape
Wood trim
Gorilla glue
Handles and Knobs
Drill
Batting
Adhesive spray
Fabric
Staple gun

Skipped a few steps in the pictures so let me fill you in on what went down first:
 First, I took off the old handles and knob (singular since it was missing one). Then I had to fill the holes with wood filler since the handles were very small and the new handles were much larger. Once the filler settled I was finally able to prime the hope chest, minus the top since that would be covered with the cushion.

  
As you can see I went with a little extra color to go with the design in the fabric. Each coat of paint took 3 coats, including the black.


This next part caused a lot of headache at first. There were groves between the color sections. My initial thought was to get dowel rods to paint them black and cover the groves. I was almost to the hardware store when I realized that using rods would not lay flush with the braided wood trim I had already decided on. No way did I want to sand the rods down to match the curves in the trim, so I was back to square one. So I finally decided to just be a big girl about it, tape it off (which I hate doing since it never seems to work out right), and then paint in the grooves with a smaller canvas brush. It worked after a few coats, but then of course I did a couple touch-ups. 


As you can see, the grooves came out pretty clean. Next, came the braided trim. I had them cut to size and then I sanded the top sections down a bit so they would fit underneath the lid. I was then finally able to paint them before gluing them down with Gorilla Glue. (Warning: use SMALL amounts of Gorilla Glue or else you will have foam coming out the sides, yes, foam.)


 Finally it was time to get the cushion together! Once again I needed a little help with this part, so I put my mother to work. We first rolled up the batting to where it was even on the top of the hope chest lid. When we had it the way we wanted it we used adhesive glue spray to keep the batting in place while we had the lid up and down to staple the fabric into place. There was a lot of tugging, stapling, cutting, and do-overs when getting the cushion stapled underneath the lid. No, it does not look perfect under the lid.... but that's okay for now. If it bothers me enough down the road I may get some more fabric to cover the inside.

TADA! It's finished.


 Close up of the handles... which we drilled new holes into the chest for. I learned the hard way that not all handles from Hobby Lobby are created equally! The top one was half an inch shorter than the others, so I had to make a trip back to the store to get another.


Top view of the fabric! Love it, but the cushion is not completely even yet. The batting needs worn in to become even, so if any volunteers want to sit their derrière on it for awhile come on over!


Little closer view of the braided trim...


... as well as the little knobs. 

I hope I did justice in giving this old piece new life. I can't wait to get it into my new house, with a hanging shelf above it to create the whole mudroom look! Thanks again Grandma Chubby!

Until next time, 
Audra