

Today I have some quick how-to projects that are all for the 4th of July!
There aren't step by step pictures, but they are simple enough that I think you will be able to catch on.

For most projects we used paint sample containers from Home Depot in the red, white, and blue, as well as twine and scotch tape.
**********
Wooden Fireworks
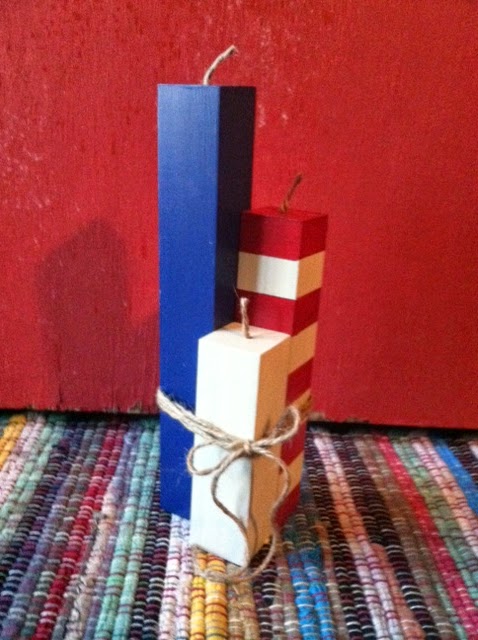
We simply cut a scrap of wood into 3 different heights.
(12 inches, 9 inches, and 6 inches)
Then we painted each one to match the red, white, and blue theme.
For the striped firework, I painted it all the cream color first. Once it dried I went back and scotch taped off every other inch so that the red paint would appear in stripes.
I plan on going back and adding creme stars to the blue firework.
When everything was dry we simply drilled small holes into the top of the fireworks and used strong super glue to hold the twine wicks in place.
Wrap some twine around the whole set a few times, make a little bow, and you're done!
**********
Snap, Crackle, and Pop Mason Jars

Your first stop is the fireworks stand.
You will need: snappers, sparklers, and champagne poppers.
Distribute them into 3 different mason jars.
On the outside of the jar you can get creative with the labels. We found our little chalkboards on clothespins from Michael's.
Snap = snappers
Crackle = sparklers
Pop = champagne poppers
This was the easiest, but most costly project for us.
**********
Striped Shutter

This is a project if you have a lot of patience and time.
Using an old shutter, start by taping off every other slat so you don't have to go over dripped spots.
Paint the first set of slats red.
Do the same thing with the cream and complete the outside of the shutter as well.
Be prepared to go back and do touch ups, like on the inside boarder of the slats.
Then you attach the metal blue star. We were lucky enough to find the exact one at Michael's. But if you can't find one that is already blue, go ahead and spray paint the one you were able to find.
**********
Patriotic Sign

This is actually a project using a cabinet door!
We just taped of the sections and painted them with the same paint that we used for all of the other projects.
Then I taped off the section I wanted writing in to act as a guide for making the letters the same size.
Using a Sharpie Oil-Based marker, add you lettering.
For whatever reason my best work is done free-handed, but that does leave room for error. For example, I only planned on having Stars and Stripes Forever but when I was done it wasn't centered so I added the little text on the end. But you couldn't tell that before I told you, right? ;)
If you aren't comfortable with free-handing it go ahead with stencils or projecting letters.
Hopefully I was able to break down several projects at once in a decent manner. As always, if you have questions please feel free to ask! I would love to give you more advice you take on any of these projects yourself.
Creatively Yours,
Audra
No comments:
Post a Comment