Sunday, December 7, 2014

DIY Rudolph Sign Tutorial


During homework breaks this weekend I put together this quick and original Rudolph sign.
I'm excited to share the tutorial with you just in time for the holiday season!


All of the materials for the project were from Hobby Lobby: 
- Unfinished wooden sign 
- Acrylic paint (both flat and glittered)
- Paint brush 
- Woodpile letters
- Unfinished wooden circles
- Reindeer silhouette cut-outs
(Not pictured: Mod Podge, hot glue, foam brush and pens) 


The first step to this easy project was to paint the wooden sign. 
I used the white indoor paint just so I wouldn't have to do excessive coats to get the bright color of white. On the outside and inside edges I used 2 coats and on the edge facing outward I used three coats. 


Next up was the inside color of the sign. 

I am really digging the turquoise and red combination that has been popular this season, but you can choose any color you would like! I painted the edges as carefully as possible so it did not bleed into the white inside edge. If I messed up on an edge I used a wet Q-Tip to remove the paint before it dried. There were only 2 coats needed for the blue acrylic paint. 

For the nose I used a brilliant glittered acrylic paint called Ceramacoat.  
I followed the specific instructions of letting a coat dry for an hour before adding another. Sometimes it is so hard to be patient with paint directions, but I wanted to make sure the glitter worked correctly. I applied 4 coats of this paint to get a fully coated nose. 


Look how sparkily that nose is! So much glitter that it really made it hard to get a picture. 

The next step in this process was to complete Rudolph's face. The eyes were created with the same white paint used for the edges. An ink pen was used to outline to create more dimensions. To glue his cute little face down I simply used a thin layer of Mod Podge on the back, which was applied with a foam brush. 


The final step was just hot gluing down the letter! So simple, but you do have to use precision to get it where you want it the first time. I did end up having to pull one letter off and the dried glue came right off so I could apply a new coat, which was a pleasant surprise for this glue gun queen!


This particular sign from Hobby Lobby can either be stood up like it is in the above pictures or you could add a string since there are hangers attached to the back. 


I just loved this how this sign went with my existing decor! 
It was a fun and easy project that I hope you enjoyed this tutorial. 
What changes would you make to go with your decor? 
Let me know!

Creatively Yours, 
Audra 

Thursday, October 2, 2014

My Inspiration in Tattoos: Part One - Proverbs 31:25


The last few years Proverbs 31:25 has been my favorite verse and I have since dubbed it my "life verse." To me, a Proverbs 31 Woman is everything that I strive to be. I have always struggled with self-confidence and worry, and have always done my best to hide those insecurities because I viewed them as weaknesses. Through life experience I have learned that is not the case, but more often than not, part of life. It is this verse that helps to set me straight when I need strength, dignity, and reassurance. 

When my brother passed away this is one of the two bible verses I clung to like a lifeline. I had to believe that God would see me through and that somehow the future would be brighter than what my present at that time was. Although the hurt is still raw and won't ever go away, I have learned how to be strong and hold myself in a way that exemplifies Proverbs 31:25. Being strong and holding myself with dignity would be something my brother Eli would tell me to do. So each time I think of this verse I also think of my biggest encourager, my little brother.  


A mere two weeks after Eli passed away I impulsively got two tattoos, on my wrists. One was his life verse and the other was mine, as always, we go together so there was no way I could do one with out the other. I never thought I would get a tattoo, let alone having three now, but I definitely don't regret the decision and thankful for something that will last my lifetime. 

As you can see in the picture I chose white ink. Although I wanted the tattoos, I did not want them to stick out mainly because I'm an elementary teacher. I would also get easily side tracked if I had the dark ink on my wrists! The picture above was taken the day of so it is very visible. Currently, they look like nothing more than scars to people who happen to be looking close enough. 

This tattoo is my daily reminder of the woman I want to be: strong, full of dignity, laughter, and without worry. 

In Strength, 
Audra

#write31days


Hello strangers! 

I'm baaack, even though things are so crazy busy right now I'm barely keeping my nose above the water... but I'm excited to get started with the #write31days challenge!

It's pretty simple, bloggers are all making the commitment to the challenge of blogging 31 days straight in the month of October. It wall started by Myquillan Smith, aka The Nester. (If you haven't checked out her home decor book, The Nesting Place, which is all about making your house a home, you totally should!

Anyways, she suggests that you pick a topic and do a series that lasts the month. There are some pretty cool ideas and over 1,200 bloggers already signed up. You can find 31 days of devotionals, how to be a serving wife, motherhood, falling in love with the journey, turning busy in to blessing, and SO, SO, SO much more! Check out the #write31days on Instagram to easily find a blog or look at the website for more information!


My topic is going to be on the same lines as it always is, just a little more intentional and outlined so I can stay on top of things a little better (as you can see above). This month I am going to tell you all about how I am inspired to create, as well as sharing some projects and other handmade crafters that I hope will get you inspired too! At the end of the month I'm going to take a few days to share with you where I want to see this blog (and hopefully) small business going... after I'm finished with coaching and finishing my Master's this semester, of course!

Hope you join for this journey of 31 days!
Audra

Day One: Introduction 
Day Three: 
Day Four: 
Day Five: 
Day Six: 
Day Seven: 
Day Eight: 
Day Nine: 
Day Ten: 
Day Eleven: 
Day Twelve: 
Day Thirteen: 
Day Fourteen: 
Day Fifteen: 
Day Sixteen: 
Day Seventeen: 
Day Eighteen: 
Day Nineteen: 
Day Twenty: 
Day Twenty-One: 
Day Twenty-Two: 
Day Twenty-Three: 
Day Twenty-Four: 
Day Twenty-Five: 
Day Twenty-Six: 
Day Twenty-Seven: 
Day Twenty-Eight: 
Day Twenty-Nine:
Day Thirty: 
Day THIRTY-ONE: 

Thursday, July 3, 2014

Thirty by Thirty Thursday the Introduction


If you are my friend on Facebook or Instagram you have probably already seen my list of things I want to do before I hit thirty! Now that I'm closer to 30 than 20, it just seemed right to set some goals and accomplish some big things before my next decade of life starts. 

Here's the list: 


For some reason I decided to go after the one that I thought would be the hardest first... giving up Diet Coke. I could easily down a 2 liter a day if you let me. (Crazy, I know!)
 But it surprisingly has not been bad at all! 
I've made it 17 days so far... so I've almost made it a "habit," which is considered 21 days. I had some headaches the first few days without caffeine but now I feel better and can tell a difference in my breathing. And I know I'm saving a lot of money too!

As you can tell, some of the things on my list can become pretty costly. But I made a conscience effort to make sure that half the things on my list were actually free. 

Next week I will tell you more about #1 on my list, which I can't express enough how important it is to me. So please, come back next week to hear what I will be up to in remembrance of my little brother!

Do you see anything on my list that you would want to do too? 
If so, let me know and we can accomplish them together!

What would you put on your list? Or even your bucket list? 
Let me know!

Creatively Yours, 
Audra

Wednesday, July 2, 2014

WILW: ReStore HFH, Broccoli Salad, and Young House Love


1) Crafting Supplies 

Restore by Habitat for Humanity


What a great store! It is full of spare parts you could use to make repairs or build things in your house. It's like Goodwill for homeowners! The parts are all dropped off donations and all proceeds go to a good cause. 

As a crafter, I fell in love with this store this past weekend. So many creative ideas for projects flew through my mind while I walked through the place, a couple times. 

If you joined me yesterday for the DIY 4th of July Decor you actually saw some of my great finds! The shutter was $5, the cabinet door used for a sign was $4, and the wood for the fireworks was a mere $1.25. No too shabby for durable wood pieces.

To find the closest location to you, just google Restore Habitat for Humanity. The great thing about it is every store will have completely different supplies available! I can't wait to go back. 


2) Everyday Living

Broccoli Salad
(It's the best! Trust me, I'm a picky eater.)


3 heads of sliced broccoli
1 cup of dried cranberries
1 cup of sunflower seeds
1 package of bacon, cooked and cut in small pieces
Mixed together and added last:
- 1 cup of mayonnaise
- 1/4 cup sugar
- 4 tbsp. red wine vinegar 

3) Reading or Blogging

Young House Love


I LOVE this book!!
It is full of super easy crafts and projects to spruce up your house (for cheap) to make it truly yours. It also makes a great house warming gift!
There were some ideas in here that I have seen before, but it only reminded me of projects that I need to get finished... like using fabric to upgrade the backboard of a bookshelf. Check out their blog if you want even more ideas or backstory. 

See you tomorrow!

Creatively Yours, 
Audra


Tuesday, July 1, 2014

DIY 4th of July Decor


Today I have some quick how-to projects that are all for the 4th of July!
There aren't step by step pictures, but they are simple enough that I think you will be able to catch on. 


For most projects we used paint sample containers from Home Depot in the red, white, and blue, as well as twine and scotch tape. 

**********

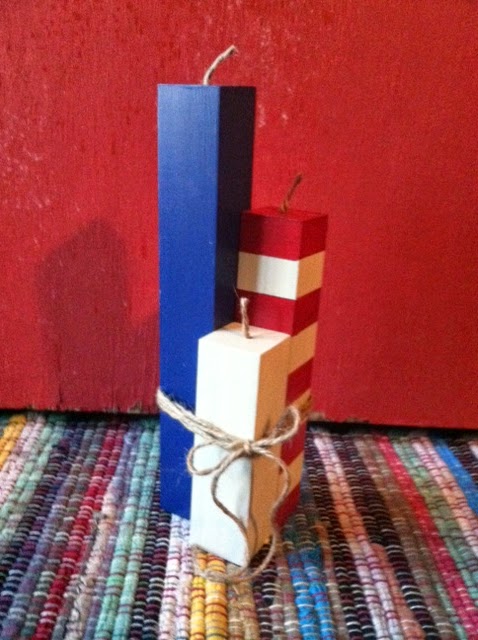
Wooden Fireworks


We simply cut a scrap of wood into 3 different heights. 
(12 inches, 9 inches, and 6 inches)
Then we painted each one to match the red, white, and blue theme. 
For the striped firework, I painted it all the cream color first. Once it dried I went back and scotch taped off every other inch so that the red paint would appear in stripes. 
I plan on going back and adding creme stars to the blue firework. 
When everything was dry we simply drilled small holes into the top of the fireworks and used strong super glue to hold the twine wicks in place. 
Wrap some twine around the whole set a few times, make a little bow, and you're done!

**********

Snap, Crackle, and Pop Mason Jars


Your first stop is the fireworks stand. 
You will need: snappers, sparklers, and champagne poppers. 
Distribute them into 3 different mason jars. 
On the outside of the jar you can get creative with the labels. We found our little chalkboards on clothespins from Michael's. 
Snap = snappers
Crackle = sparklers
Pop = champagne poppers
This was the easiest, but most costly project for us. 

**********

Striped Shutter


This is a project if you have a lot of patience and time. 
Using an old shutter, start by taping off every other slat so you don't have to go over dripped spots. 
Paint the first set of slats red. 
Do the same thing with the cream and complete the outside of the shutter as well. 
Be prepared to go back and do touch ups, like on the inside boarder of the slats. 
Then you attach the metal blue star. We were lucky enough to find the exact one at Michael's. But if you can't find one that is already blue, go ahead and spray paint the one you were able to find. 

**********

Patriotic Sign


This is actually a project using a cabinet door! 
We just taped of the sections and painted them with the same paint that we used for all of the other projects. 
Then I taped off the section I wanted writing in to act as a guide for making the letters the same size. 
Using a Sharpie Oil-Based marker, add you lettering. 
For whatever reason my best work is done free-handed, but that does leave room for error. For example, I only planned on having Stars and Stripes Forever but when I was done it wasn't centered so I added the little text on the end. But you couldn't tell that before I told you, right? ;) 
If you aren't comfortable with free-handing it go ahead with stencils or projecting letters. 

Hopefully I was able to break down several projects at once in a decent manner. As always, if you have questions please feel free to ask! I would love to give you more advice you take on any of these projects yourself. 

Creatively Yours, 
Audra 

Monday, June 30, 2014

The Great Handmade Heist and Later This Week

I'm back for another creative-filled week after spending a several days crafting with one of my very best friends. I see a trend here, and I'm okay with that! 
I will show you what we were up to later this week as well as some more goodies that I need to catch up on:

Last week for Makers Gonna Make Monday I told you about CLICKforbabies.org.
And I've found another great cause created by crafters to share with you this week!
There are SO many different crafting auctions on Instagram that raise money for adoptions... both international and local. 
But this is something different... and I am just loving the creativity put into it.


Have you ever been to a Murder Mystery Dinner Party? 
(If you haven't you totally should!!)
Well, The Great Handmade Heist is the cousin to those dinner parties... in a totally amazing way! 

Once registered, clues will be given out to figure out where all of the missing crafts have gone! And if you figure out who the craft stealer was you win over $500 in amazing products from some of my favorite Instagram crafters. 
The cost of registration goes to the adoption of a sweet little boy AND you get a FREE t-shirt that is totally adorable. 
To find out more details about The Great Handmade Heist, click here

Creatively Yours, 
Audra

Tuesday, June 24, 2014

DIY Mixed Media Wall Art

Tonight's DIY is a Mixed Media Wall Art that you can make totally your own! 
Let me show you what I mean...

To start off with, I was actually inspired by a tutorial my mom found on Pinterest. 
She took that tutorial to guide her to make a great piece for their bedroom. 
I'm so proud of her!


I, on the other hand, took it and made it totally my own... Wild and crazy. 


The whole reason I went down a different road with this project was because I fell in love with the scrapbook paper! Which surprisingly wouldn't be a normal choice for me, so I went with it before I changed my mind!

Here's how I did it! Feel free to use it as a guide to make it your own.

All the materials were purchased from Michael's: 
Canvas
Wood plaque
Scrapbook paper
Modge Podge
Wood scroll
Felt
Hot glue gun
Paint & Spray paint


The first step was to trace the scrapbook paper to match the size of the wood plaque.


You simply turn the wood and scrapbook paper over and use a pencil to trace the very inside of the plaque groove. 


It may not end up perfect due to the tracing, but that's okay!


Before gluing on the paper, the rest of the wooden plaque that will still be showing needs to be spray painted. Remember: thin coats!


While the spray paint is try, you can work on getting the background canvas painted with acrylic paint!


You will notice that I didn't paint the middle of the canvas... no need to waste paint on something that will be completely cover! 
Also, I loved using the black paint! There was only need for ONE coat, which is a miracle.


Once you have the wooden scroll spray painted you are set to start attaching the pieces.


Handy Dandy Modge Podge! My favorite is the one made for paper... I haven't had much success with the others. 


Once again, it's all in the thin coats! 
I put it on the paper first and the laid it on the wood. Then I went back to add more to the corners to really adhere it. 


May be hard to see, but it's not perfectly even... and that's okay!
The perfectionist is learning!!! (or relaxing)


Now, in the tutorial and my mom's project they used a monogram letter.
It turns out super cute, but I'm just not a fan of monograms. 
Instead, I wanted to do something different. At first I wanted to use the word "create," but then I figured out it really wouldn't fit on the board right. 
So instead, I decided to recreate one of the flowers on the scrapbook paper out of felt!


This is where some people call me crazy, I'm more of a free hander than an exact science kind of girl... so I just started cutting things out and laying the colors down. 


I used the flower in the top left corner above to be my guide for recreating the flower. 


I got the whole flower done in the basic shape using half circles...


And then I went back and rounded them off more to better match the paper. 
(See the petal directly under the center)


Ta-Done! Well, maybe not. I decided it wasn't 3D enough and I wanted to add more of a border to the flower...


So I added the white felt underneath each petal. 
Just glue the pink piece down on the white felt using a hot glue gun and then cut it out with a little extra white for the border. 


All laid out and ready to go!


Use the hot glue gun to glue it all together one layer at a time. 


When the flower was done it was time to attach it all together using a hot glue gun! YAY!
First was the wooden scroll attached to the scrapbooked wooden plaque... 


Then the flower was added...


And then it was all glued onto the canvas! 
Here you can see the complete project on my parent's wall for some quick pictures. 


A side picture to show you the little 3D-ness this project has!


I believe I will be putting it on a crisp, white wall in the craft room!

Hopefully you enjoyed this wild and crazy rendition of a subtle monogram wall art. 
Remember, you can always find an amazing project and still MAKE IT YOUR OWN!!

Creatively Yours, 
Audra